I am very lucky that my husband knows me better than I know myself. Two anniversaries ago David got me a mushroom grow kit since he knew how much I was falling in love with gardening. At the time I was too preoccupied with growing seedlings to truly appreciate the gift. It took until after I read a book by Mark Shepard on Permaculture that I realized how special mushroom’s relationship is to the gardening world. Mushrooms are a family favorite for both my dad, hubby, and grand parents, so I was excited to learn about how mushrooms can improve the garden and be a recurring food source on the homestead.

As excited as I was though, there is so much information surrounding mycology. It seemed like those who were pursuing an interest in growing mushrooms were having giant tents inside their home, creating cultures, using vent hoods, which while incredibly interesting, a girl just wants to grow some mushrooms. I wanted to be able to make enough for us to eat and for tinctures, not to have a business (not yet anyway).
That being said, aside from growing mushrooms for meals and tinctures, I also wanted to make sure that it was affordable and ideally used resources that we had around the homestead or easily obtainable. I’m not afraid of putting some money in if there is going to be return on my investment, but I’m not going to do that without a plan in place.
That being said, after a few harvests, I started the research machine to find the most cost effective option for growing mushrooms. In this guide you will find the beginner and intermediate guide to get set up. I will have a guide for advanced growers, which is the best bang for your buck, at less than $.50 a pound, but this will get you very far and will prepare you for all of the skills by the time that guide is up.
I will provide some affiliated links that will allow me to earn a small commission if you decide you want to make a similar decision as I did and purchase some of these great products (Win Win!)
Full Guide

Vocabulary:
There is a lot of unique terminology in mushroom growing, so if you are not familiar with some of the jargon I put it here for easy reference.
Mushroom: Specifically, the fruit of the mushroom body. Mush like a tomato to a tomato plant. It makes up a small part of the overall organism and is used to propagate by releasing spores (instead of seeds).
Mycelium: The “Roots” or body of the mushroom. This is the bulk of the organism. In a bag or in the ground it is bright white and can be thick or look like fine strands.
Substrate: The growing medium of that mushroom. Each mushroom prefers a different substrate. Some like wood (shiitake, lion’s mane, chestnut), others like dung (your typical Bella mushrooms/button mushroom), and oysters bless their figurative heart like most things including straw, coffee grounds or fine cardboard.
Spawn: Typically a grain or sawdust that has been colonized with a particular type of mushroom culture.
Field Capacity: The ideal amount of moisture in a substrate. It should be fully saturated with water, but not dripping. You can use a squeeze test, and it is good if it only has a couple drops.
Spores: The reproductive cells of the mushrooms. While colonization happens asexually, spores will produce different variations.
Benefits to the Garden
Growing Mushrooms
Indoors
Knowing What You Are Getting
I was so excited about being able to grow things indoors, largely because I have heard so many horror stories about misidentification of mushrooms and it causing anything from a stomach ache to fatalities. My aunt used to forage for mushrooms on her ranch, and there were a couple bouts of stomach upset that she attributed to the mushrooms she harvested. Since this is largely akin to planting a seed, I know exactly what I should be getting and if I did everything I was supposed to (in terms of sterilization) then there is only one expected result.

Benchmarks
Much like growing a seed for vegetables, you know what you are getting, about what size, and how much. If you planted a Celebrity tomato plant, known for it’s prolific production, you might be disappointed if it ended up be Cherokee purple because you were looking for yield. Part of knowing what you planted, and how many, the same principle applies to mushrooms. If you give certain amount of food, or substrate” to the mushrooms, you can expect a certain amount of harvest. Similarly, while different from type to type, you can expect certain mushrooms to grow at certain speeds, with oysters being a relatively aggressive variety, versus shiitake that might take several more weeks.
Control
Hi… I’m Allison… I’m a control freak. I recognize that about myself and for the sake of my friends and family, I try to minimize it in my interaction with others. However, it is nice that I am not at the whim of a drought, cold snap, or humidity. The best thing about being able to grow mushrooms indoors is the level of predictability and control you have on it. If you do things correctly, there should be consistency.

With mushrooms liking a certain amount of humidity, light, and need time to grow and fruit, most of those things I can support. I did make the call to buy a North Spore Boom Room II because of this, and while it is great for maintaining humidity and airflow, it does has a sizeable footprint.
Outdoors
Less Maintenance
I have a few beds for mushrooms around my home. One in our shade garden where we have a soaker hose to help support the foundation of our house, and a couple in the front yard, which while it gets a lot of sun, it gets watered regularly, and the goal is that there is enough plants to provide shade, keep the soil cool, and I will ideally get to reap the benefit of the relationship between the mushrooms and the plants. Compared to the mushrooms I have growing indoors, these are incredibly less maintenance as I have not had to do much extra to keep the mycelium growing.

The Challenges with Growing Mushrooms
Indoors
High Maintenance
I acknowledged I am a control freak, but there are some days where I’m not feeling it. I have not had too many trips out of town since having my Boom Room Martha Tent, so part of me is worried about they will do when I do make that eventual trip.
I also had no idea how much water I would go through in order to keep up the humidity in the grow tent. You can use distilled or tap water, but we have very hard water and with the humidifier not being cheap, I wanted to have distilled water to keep it working as long as possible.
That being said, I bought a water distiller and I need to make at least one gallon of distilled water every day. Two to three gallons would be ideal, that way I have some on hand for when I do eventually go out of town. The tank I have is about 5-6 gallons, so it will last a few days without adding to it once it’s full, but I definitely don’t want it to go dry.
Space
We used to have a dedicated bedroom for a home gym with a bow flex. We did use it, up until DH got so strong that he ended up just going to the gym. Well it went from being his “man cave” to my plant nursery. Once the bowflex is out of the way, we will move our Martha tent into the room, but as it stands, the mushrooms themselves do take up space, even aside from the tent.

I am making a few 3 or 5 lb blocks of substrate very week, and while I have them lined up under my kitchen island, it’s not the most attractive option. Our small grow room will be very full once it is set up.

Outdoors:
Water:
Mushrooms are mostly water, I guess most things are, but mushrooms need it. If you don’t already have an irrigation system put in place outside, unless you have incredible amounts of rain, you will need something to help keep it moist.

Time:
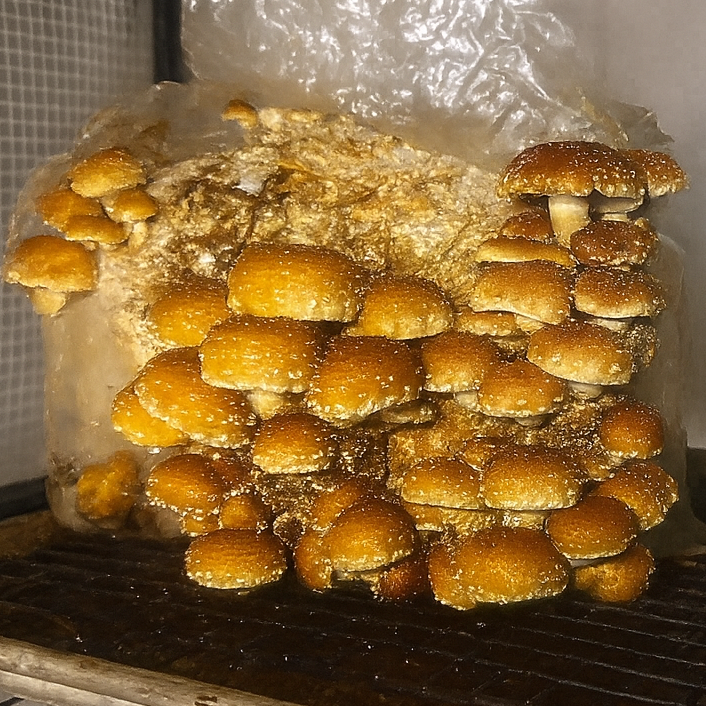
It can take a lot longer for the mycelium to grow and colonize a bed. It’s not an ideal situation like growing indoors, where substrate has been sanitized, given the best food, and is living the good life. I planted some Redwine Mushroom Spawn, one of the best mushrooms for supporting plants in my garden, and while it’s been 4 months, granted we are in summer now, I have not seen a harvest yet. I know it can take a few months to get your first harvest, and I’m sure I’ll be happy then, but there is a bit of waiting.
Identification
Did I mention I am very paranoid about identification? There are countless varieties of even edible mushrooms, and when I do get my first wine cap, I know I will be looking for all of the tell-tale signs of that variety. The color, the wine colored spores, the veil, and honestly, I’ll still be paranoid I’m sure. I don’t doubt my comfort will ease after the first few harvests, especially if they’re popping up where I “planted” them, but if they decide to spread to other areas, I’ll still be cautious.
Beginner Guide:
For a beginner, the main focus is to just get growing! To build your self efficacy, to see if it’s something you want to maintain longer term before making a larger investment of your time, money and energy.
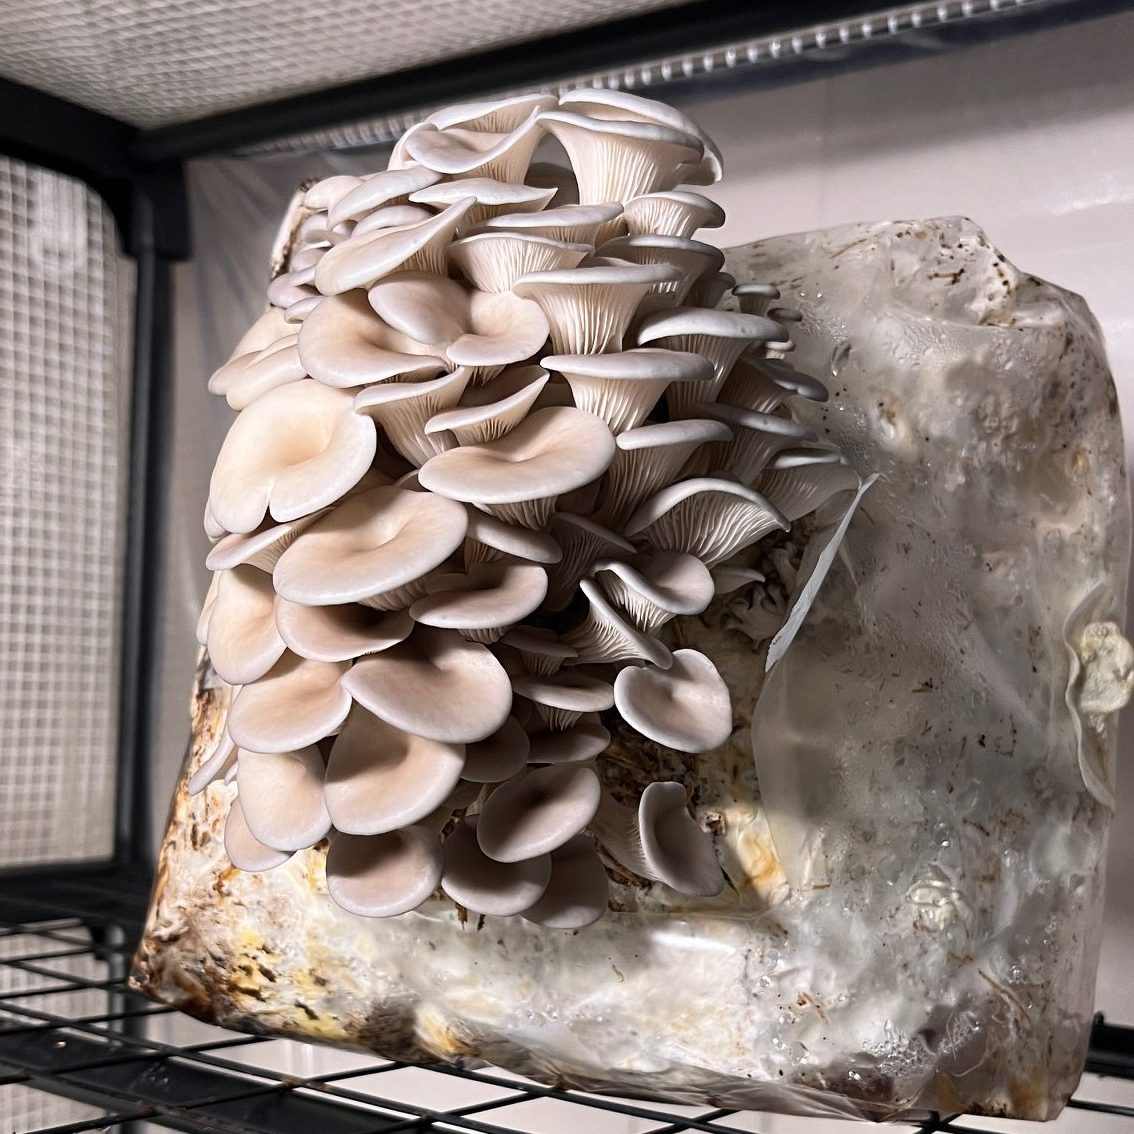
Fruiting Blocks & Grow Kits
Here you will be looking for kits or fruiting blocks. These are already colonized substrate, where largely the mycelium just needs fresh air and maybe cool water in order to fruit. These can be large or small and will typically give 1-2 harvests. The size of harvest will vary depending on the size of the block, but you can expect anywhere from 30-50% of the weight of the block over both flushes.
These can be anywhere from a half pound to five pound blocks. They are almost guaranteed to get you a harvest, which can be a great way to get your feet wet to growing your own mushroom. They can be left on a kitchen counter or partially buried in your garden, leaving just the top exposed.

They don’t require a lot of maintenance, typically misting with water to keep up humidity. The issue is they don’t last as long inherently. If you leave some them out after the 2nd flush where they will release spores or the mycelium might spread to other parts of the garden outside, you might get volunteer mushrooms somewhere else, but it’s not guaranteed.
If you decide you absolutely love to grow mushrooms you do have the ability to break it up after the 2nd flush, and move on to the intermediate growing.
Beginner Shopping List
Since this is for the beginners, we are not looking to break the bank. This is where I started and it’s a great low cost low risk option if you are looking to see if you like the growing experience and seeing if you can keep up with regular misting to keep the mushrooms hydrated.
Consider buying one of these kits:
- $~16 : Back to Roots Blue Oyster Mushroom Grow Kit
- $~ 30 : North Spore Golden Oyster Mushroom Grow Kit
- $~30 : North Spore Pink Oyster Mushroom Grow Kit
Intermediate Guide:
Why Use Grain/Saw Dust Spawn?
You will start finding a good bang for your buck here. Instead of a fruiting block you will be looking for grain spawn or sawdust spawn. You want to grow from grain spawn or sawdust spawn if you plant to treat them like a seed. You are willing to wait weeks or months for mushrooms, and you are able to give it the food/substrate it needs to grow.

The main difference is grain spawn is given a lot of nutrition (the grain) so it can grow very fast but cannot cover a large area. Sawdust is less nutritious but can cover a larger area (a 5lb block can cover about 15-25 square feet. Also, if you are growing mushrooms inside, I’d recommend grain spawn versus outside I’d recommend sawdust.
Which type of oyster should I buy?
I highly recommend Blue Oyster especially if growing indoors or if you are growing outdoors and have cooler weather. Blue oyster is perfect for beginners as it is very forgiving. If you are growing outdoors and you are in a warm climate, consider the pink or golden.
Blue oyster mushrooms are a cool-weather favorite (but easily grow indoors in Texas/Oklahoma), known for their rich, earthy flavor and meaty texture that holds up well in stir-fries or on the grill. They colonize quickly and fruit reliably, making them ideal for beginners or growers who want consistent results.

Pink oyster mushrooms are a fast-growing, heat-loving variety that bursts with vivid coral color. They’re perfect for warm climates or quick-turnaround harvests, often fruiting in just 10 to 12 days.

Or golden oyster mushrooms do best in moderate to warm temperatures and reward careful humidity and airflow management with beautiful, cascading golden flushes with a light citrus taste and aroma.

Indoor Mushroom Growing
If you are growing mushrooms inside, consider getting Oyster Mushrooms for your variety. This variety does not need to have a substrate that needs to be sterilized (pressure canner) and instead the substrate can have pasteurized straw, coffee grounds, or hardwood pellets and adding to a larger bag. While more advanced, if you want more specialty varieties, you can pressure can the substrate it to sterilize it. Once it cools you can add your grain spawn in 1lb increments to each 5 lb bag of substrate.
Remember that spent fruiting block I mentioned earlier, while not as strong as fresh grain spawn, you can break that block up and add it to fresh substrate to keep it alive and encourage it to keep growing and producing more mushrooms. You will want to keep with a 20-25% rule if you are breaking it up. It cannot do this forever, but most oyster species can do this for a growing season (4-6 months) before it just begins to slow down due to age. However, if you notice any mold, green or slimy, or if your fruiting block smells badly, do not use it as it has likely been contaminated and will not fruit as expected.

You can also take 1lb of grain spawn and divide it to five quart size jars of sterilized grain spawn to expand the amount of spawn you have on hand.
This is going to be more expensive than your grow kits initially, but many of these items can get you dozens of bags of mushrooms. If you love to eat mushrooms or want to dry them at home, this will be your best bet.
Shopping List for Intermediate Indoor Growers:
- $~40 Straw for Substrate
- $0! Free at coffee house or from home: Spent Coffee Grounds
- $~30 Impulse Sealer for Sealing Bags (can use Food saver sealer feature as well!)
- $~30 Unicorn Bag for holding Grain or Substrate
- $~15 BBQ Hardwood Pellets for Substrate
- $~30 Blue Oyster Grain Spawn, Pink Oyster Grain Spawn, or Golden Oyster Grain Spawn
Recipes with Grain Spawn
This is a great starting point for each of the major varieties of oyster mushrooms. When getting your substrate prepared, I would get a large pot for each of the ingredients, and pour boiling water over it to cover and let it sit for an hour. Once it has been pasteurized, strain the water, and squeeze it until only a couple drops come out. *Note if you coffee grounds are fresh, in the last day, they do not need to be re-pasteurized and can be added as is to the bag.*
After it has reached this field capacity, I add it to my bag that is sitting on a scale and weigh it for the wet measurements below. Once everything is added, if it is relatively temperate, not too hot, you can add 1 lb of your grain spawn to the bag. Then use your impulse sealer to keep everything sealed off and prevent against contamination.
| Ingredient | Blue Oyster | Pink Oyster | Golden Oyster |
|---|---|---|---|
| Chopped Straw | 2.75 lb (0.61 lb dry) | 3.00 lb (0.66 lb dry) | 3.25 lb (0.72 lb dry) |
| Coffee Grounds | 1.25 lb (0.50 lb dry) | 1.25 lb (0.50 lb dry) | 1.00 lb (0.40 lb dry) |
| Hardwood Pellets | 1.00 lb (0.90 lb dry) | 0.75 lb (0.68 lb dry) | 0.75 lb (0.68 lb dry) |
| Total Wet Weight | 5.00 lb | 5.00 lb | 5.00 lb |
| Total Dry Weight | ~2.01 lb | ~1.84 lb | ~1.80 lb |
Squeeze the bag and listen and look for any imperfections in the seal. Mix the grain spawn thoroughly with the substrate to ensure that everything is mixed well together.

Then the hard part. Wait. Typically just 2-3 weeks and you will notice it being covered in white mycelium. You know after a 2-3 days if you are on the right track when you see little pops of white coming out of the substrate. Unfortunately if you notice any green, the bag is contaminated and will be hard to save.
Once it is covered in white, you can treat it like a fruiting block. Cut a large slit in the bag and keep it moist or you can plant them outside! You should see pins in about a week but I have seen them in as little as 3 days. Ensure there is some indirect light so the mushrooms can grow towards it and don’t forget to keep it well misted.

Outdoor Mushroom Growing
If you don’t have the space inside, you are not a control freak like I am, or you have more mild temperatures, consider growing outside. You have the option to grow directly in garden beds, create your own fruiting blocks and planting them, or growing in 5 gallon buckets.
If you dedicate a garden bed consider using straw, wood chips, and hulls and layering them with each other and the sawdust spawn so it will eventually colonize the whole bed. Just make sure you keep it moist and water it like you would water your other garden beds! Winecap Mushrooms are great varieties for garden beds as they love the soil biome of bacteria, insects, and other fungi.
Alternatively, you can also use 5 gallon buckets to grow your mushrooms for all varieties of oyster mushrooms. Pasteurize your straw (1.5 dry lbs if using coffee grounds or 2lbs if not) and any coffee grounds (if you want to use it), but don’t let the coffee grounds exceed more than 30% of the overall volume to decrease contamination risk. Let it sit for an hour. While you wait, drill either 1/2″ to 1″ size hole in the bucket every 4-6″.
Once the straw has been pasteurized and has cooled slightly, start layering your straw and coffee grounds (if using). Every few inches of straw/coffee grounds, take your 1-1.5 lbs of grain spawn and add some of it between the layers. Treat it similar to the wine cap beds above, in that you want several layers to ensure even distribution of the spawn.

If you have issues with bugs, slugs, or humidity (I am sure everyone has one of those!) cover the holes with a micropore tape. Let the buckets sit with the lid on, out of direct sunlight, for about 2 weeks. After they have had a chance to sit and colonize, you can take off the tape and you should see white mycelium in the holes and if you take the lid off you should see plenty on the top as well. With this increase of air flow, you should see pinning in a few days. Harvest by cutting the mushrooms off at the base and cover them with tape again to let it sit to prepare for a 2nd flush.

Outdoor Mushroom Growing Shopping List
- $~40 Straw for Substrate
- $0! Free at coffee house or from home: Spent Coffee Grounds
- $~30 Blue Oyster Grain Spawn, Pink Oyster Grain Spawn, or Golden Oyster Grain Spawn or Winecap Mushroom Spawn
- $~25Food Grade 5 Gallon Buckets : You can probably find cheaper at your local hardware store or free from restaurants/bakeries.
What To Do After 2-3 Flushes
Your first flush, or harvest in the mushroom world, you can easily expect a second. Depending on the moisture content it may be as large or larger than the first. However, after the 3rd, don’t expect much more unless you decide to add the block to more substrate. If you decide that block is spent, and you do not want to use it to colonize more substrate, congratulations you have your own home made mushroom compost! This is great to add to the garden and will add a lot of nutrition to your garden.
Harvesting Mushrooms
Whenever you harvest your mushrooms indoors or outdoors, always cut from the base. If you see any small or dried up mushrooms after the harvest, it’s not likely they will get much bigger and should be picked off before setting up for the next flush. Remove any substrate from the base or cut it off. You can also save the base to help colonize more!

You want to also make sure the mushrooms are not “dropping spores”. The main concern if they are, is shelf life. If harvesting oyster mushrooms, you want to harvest it right before the cap turns concave and outer edge flattens out completely. They begin to look like trumpets when they are dropping spores. I want the biggest harvest possible, so I wait until they are almost to that point. If you are worried about spores dropping, harvest a little bit sooner. It may not be as big of a harvest, but will last longer in the fridge.
Storing/Preserving Mushrooms
With oyster mushrooms being able to produce almost as many mushrooms as dry material (3 lbs of dry straw will equal almost 2.5-3lbs of mushrooms across all flushes), you may come into a situation where you can’t eat all that you have that day! Thankfully you have a couple options.
Refrigeration: Especially if you harvest the mushrooms before their spore drops, you can have your mushrooms in the fridge for 4-6 days. I put them in a silicone bag with a moist paper towel to keep up humidity. Golden and pink oysters may not last as long at 2-4 days being optimal.
Dehydrating: Dehydrating oyster mushrooms is a great way to preserve your harvest for long-term use without sacrificing flavor. The ideal temperature for drying is between 125°F and 135°F, which gently removes moisture while maintaining their taste and texture. Depending on the variety, slice thickness, and humidity, the process usually takes between 6 to 10 hours. Pink and golden oyster mushrooms tend to dry a bit faster, while thicker types like blue or king oysters may take longer. Mushrooms are fully dried when they feel crisp and snap easily rather than bend.

Before dehydrating, gently clean your mushrooms with a soft brush or damp cloth but avoid soaking them in water. Slice larger mushrooms into thinner pieces to ensure even drying, then lay them in a single layer on your dehydrator trays with space between each piece. Once completely dry and cooled, store them in airtight containers like glass jars or vacuum-sealed bags in a cool, dark place. Properly dried oyster mushrooms can last up to a year and are perfect for tossing into soups, stews, or grinding into a flavorful mushroom powder.
How to Cook Mushrooms
There are a million different ways to cook mushrooms, so I won’t go into extensive detail, but our favorite ways to cook the mushrooms we harvest are:
- Sauteed over steak
- Sauteed with green beans
- Added to an omelette
- Sauteed or grilled with onions for a mushroom swiss burger
- Green bean casserole
- Beef Wellington
- Mushroom Soup
- Added to pastas or ravioli

I know there is a lot of information here, and more to come, but this should be able to get almost anyone started with growing mushrooms inside or outside no matter if you are just wanting to get started or you are ready to get your hands dirty. Don’t forget to subscribe to the blog to learn more about growing your own mushrooms, and check out the Advanced Mushroom Growing Guide where we will explore more varieties and how to make our own grain spawn, exploring different substrates, and recipes to grow all new kinds of fungal delights!
If you are just starting out your homestead, look at some of our other posts like Starting Self-Sufficiency: Essential Homesteading 4 Tips for Everyone or Budget-Friendly Homesteading: Save More in the Kitchen: Part 1.
Have you tried growing mushrooms at home? What is your favorite thing to make? Add your comments below!


Leave a Reply to clubschadenfreudeCancel reply