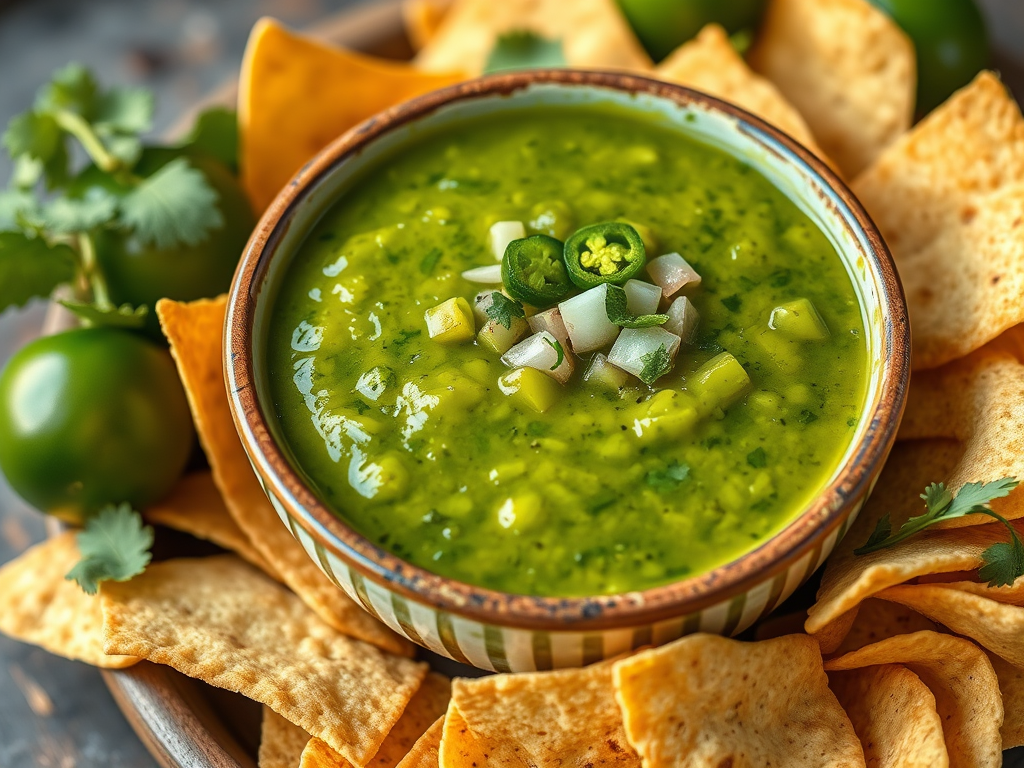
If you are anything like my family, when it comes to going out we fill up on one thing more than anything else, chips and salsa. I think it is surprising since I grew up in Texas, but it wasn’t even until I was in my late 20’s that I had even had a green salsa, this “salsa verde” (literally meaning green sauce) but it is so delicious with pork or chicken and great for dipping chips! It is bright and citrusy, zesty, and with roasted tomatoes/tomatillos it provides a depth of flavor that makes your mouth water.
Aside from the delicious flavor and variety of condiments to your favorite Tex-Mex meal, what I also love about it is that it can be made from tomatillos or green tomatoes (which makes a great use for tomatoes that haven’t ripened on the vine yet, and because of the high acidity, it can be canned for enjoying later.

Table of Contents
I will provide some affiliated links that will allow me to earn a small commission if you decide you want to make a similar decision as I did and purchase some of these great products (Win Win!)
Tomatillos or Green Tomatoes?
I am inclined to be a bit of a purist and want to use tomatillos for my salsa, but I did find a love for it with green tomatoes when both my boss and grandmother both gave me pounds upon pounds of green tomatoes, plus those that I had before our first frost.
Tomatillos have a natural tartness that gives salsa verde its signature sharpness and depth. Their citrusy and herbaceous taste pairs wonderfully with fresh chilies, onions, and cilantro, creating a well-rounded salsa that’s bold and bright.
Green tomatoes, on the other hand, provide a similar tartness but with a more subtle, less pronounced acidity. Their firm flesh holds up well in salsas, offering a smooth consistency without becoming too watery. They also bring a savory note, balancing the heat of chilies and the freshness of herbs. Both ingredients are versatile making them ideal for salsa verde.

Whether you choose tomatillos for their intense tang or green tomatoes for their milder, savory flavor, you’ll create a salsa that’s bright, flavorful, and irresistible.
In this recipe, if you decide to preserve it, you’ll be adding some lemon/lime juice concentrate along with vinegar to ensure it is at the proper pH and with the additional vegetables like peppers and onions, the differences between tomatoes and tomatillos becomes less significant.
Ingredients
The best start to any delicious salsa is fresh ingredients. If you are looking to make this from produce that is not from your garden, it may be difficult to find green tomatoes in your store. I do find the best time to use green tomatoes is right before a killing frost and you want to save whatever fruit might be out there. Tomatillos are a little bit less hard to find in your major mega-mart, and you will find them in a papery husk that needs to be removed and produce is to be rinsed before using as it can be a bit sticky.

Side Note: Growing Tomatillos
If you have a moderately warm summer, you can also grow tomatillos in the summer and get a harvest for a few months. We are in the northern Texas/Southern Oklahoma region and did not get them planted in the ground (from seed!) until June and still managed a harvest! Keep in mind though our first frost didn’t happen until end of December, so please adjust your timing in planting them accordingly.
Then with only 2 plants being grown in full sun, and a couple others under the shade of our okra plants, these plants had their work out cut for them. All that being said, given those constraints, we were still able to get about 10 lbs of tomatillos. Needless to say I highly recommend either planting them much sooner (like we did this year) or buying them.

If you decide to plant them, be sure you plant at least two plants to ensure proper pollination. I would allocate at least 2-3 square feet per plant, they do get very viney and like to wander through the garden. The husk will appear after they flower and over the course of the growing season the fruit will develop inside of the husk. The best time to harvest them is when the fruit are bright green and have almost (or completely) filled out the husk. I have waited until they are a little yellow and the flavor is different, but so long as you have mostly green tomatillos, a few yellow ones won’t hurt and less waste!
Other Vegetables
In addition to your green citrusy ingredients, whether that be green tomatoes or the tomatillos, you will also want onions, peppers and garlic. Onions will provide some sweetness along with body to the overall dip. Peppers will be able to provide sweetness, spice and potentially smokiness to the salsa.
The type of peppers can be adjusted based on the amount of heat you want. If you like spicy foods, think about using predominantly serrano peppers, or if you like a more medium heat you can have a blend of roasted poblanos, jalapeños and bell peppers. If you don’t like your salsa spicy at all, think about using all bell peppers and poblanos which will add more sweetness and earthiness. For this recipe we will give ingredients for it to be a medium heat. Suggestions for a spicier or more mild salsa will be included in the notes.

To help ensure we do not adjust the acidity/pH too much, it’s important that you keep the same ration of tomatoes/tomatillos to the other ingredients like the onions and peppers.
*Additional tip! Consider roasting, grilling or smoking your onions and peppers to give another layer of flavor!
Other Seasonings
If these ingredients don’t have your mouth watering yet, smoked paprika provides a little bit of smoke and peppery notes and a little bit of cumin will provide some earthiness and nuttiness along with that signature taste that we are so familiar with when we eat Mexican or Tex-Mex foods.
Lime Juice
We will also want to add bottled lime juice (or bottled lemon juice) to ensure there is a good amount of acidity that will allow our salsa to be canned so we can enjoy our harvest later on. Please note that if you are like me and you want to enjoy some of your hard work the day you are making it, consider ladling out what you will eat today before you add your lime juice. The acidity will be very over powering and will not be a good representation of what it will taste like when it has gone through the canning process and has had a chance to sit on the shelf.

Cilantro
I also love to add some cilantro for a fresh flavor both to the salsa before canning and if I’m feeling fancy, I might add more right before we eat it. If you do not like cilantro, or you think it tastes like soap, think about adding another herb like parsley to give it some of those fresh notes that really takes anything up to a new level. If you don’t like that either, you can omit this all together.
Preparing the Salsa
Step 1: Roasting Tomatillos/Tomatoes
Once you have all of your ingredients together preheat your oven to 450 degrees. Line a rimmed baking sheet with foil (to help up with cleanup later) and add 2 tablespoons of olive oil to the bottom of the pan.
Halve either your tomatoes or tomatillos and add them to a bowl with 2 tablespoons of olive oil, 2 teaspoons of salt and 1 teaspoon of black pepper and mix to ensure the tomatillos are thoroughly covered. Place the tomatillos/tomatoes cut side down on the cookie sheet and bake for 20 minutes.

Step 2: Preparing Onions and Peppers
While the tomatillos or tomatoes are roasting, either finely mince or chop one cup of onions (about half of a very large onion or one medium size onion), one cup of peppers, and eight cloves of garlic if you want a chunky salsa. Alternatively, if you like a fine salsa or a picante, you can use a food processor to finely mince the vegetables.
Use these recommendations to determine which peppers to use for your salsa. **Note that you will want to use one combined cup of the peppers listed, not one cup of each pepper**:
- Mild (little to no heat): 1/2 of one large bell pepper and 2 medium size poblanos
- Medium (some heat): 1 Serrano pepper, 3 jalapeños, 1/2 of one bell pepper
- Hot: 5 medium Serrano peppers, 3 medium to large jalapeños, and 2 medium poblanos

I also grow a variety of hot chili peppers (chili de arbol, cayenne, chili pequin, chilitepin) along with more earthy peppers that we use for mole and Texas style chili. If you have some of those peppers, feel free to use them too! Many of the hot peppers can be used in place of the Serranos and the earthy guajillo and costeno peppers can be used instead of the poblanos or bell peppers. Use what you have!
**If you want to roast your peppers and onions on the grill or over an open flame, be sure to do that before chopping or processing the vegetables**
Add one tablespoon of olive oil to a large stockpot and heat it over medium heat. Add the peppers and onions to start cooking down the vegetables until onions become translucent then turn the burner to the lowest setting. Once the tomatillos or tomatoes are done, take them out of the oven to allow them to cool for a few minutes. During this time, you can add the garlic and cook it over a medium heat. Do not let the garlic burn.
If you are using tomatillos, once the timer has gone off and it has cooled slightly, you will see a slight char and juices coming out, add everything (juice and flesh) directly to the stock pot with the onions.

If you are using green tomatoes, to help with both taste, texture, and preservation consider taking the skin off the tomatoes. After having roasted them for that time, you can usually pick them up from the skin and they will peel right off. Then once they have been peeled you can quarter each half (to make a rough chop) add them to the stock pot.
Picante or Chunky?
In our house we love a picante salsa. It clings to a chip beautifully. It pours gently on enchiladas, eggs, and chili. Plus it makes it very convenient for longer shelf life since we will be canning this. If you love a chunky salsa, the canning process may take some of that signature texture out of it, but if you are not canning it you can keep it for a fresh and delicious topping for any bbq, nachos, or tacos.
If making a chunky salsa you can let the heat break down a little more. Alternatively if you like a picante or thinner salsa, you can add batches of tomatoes or tomatillos to the food processor before adding them to the pot.
Want the best of both worlds? Consider making the salsa as picante and when you are ready to serve it, add fresh peppers, cilantro and onions to give it a depth of texture and flavor.

A Hidden Hero of the Kitchen
If you’re like me though, instead of dirtying up another dish, I like to break out one of my favorite tools, the immersion blender, to ensure the salsa is smooth. It makes take a little bit longer than a traditional blender or a food processor, but it’s usually worth it to ensure it’s not too watered down and to save a dish from having to be washed.
An immersion blender is not a uni-tasker. It doesn’t take up a lot of space, minimal dishes, and it is a game changer in the kitchen overall for ensuring whatever sauce, dip, or salsa is an even consistency without having to breakout the big blender or food processor. If you don’t have one already, consider buying one like this. With multiple speeds it will help control the viscosity of what you’re blending and ensure especially hot liquids don’t splatter. The removable head will make for easy cleanup.


Step 3: Adding Spices
Bring heat back up to medium and add spices including one tablespoon of cumin, one teaspoon of smoked paprika, one teaspoon of onion powder, one teaspoon of garlic powder, two teaspoons of salt. At this point you can taste the salsa and see if you’d like to add any other spices or add more salt. If you find the heat is not what you want and you want it a little hotter, start by adding cayenne pepper one half teaspoon at a time.

Once everything is combined, you can then chop and add one bunch of cilantro or parsley to your salsa Let it cook for one minute over medium heat.
If you plan to eat any of the salsa before canning it (which I always do), this is where you will ladle yourself out a bowl or cup for whatever you plan on using it for.
The last step before canning is to add the lime juice. You will need to add .5 cup of bottled lime juice. This plus the canning process will help keep any nasty bacteria from growing. Again, the canning process will make the intense flavor more mild and time on the shelf will balance it out even more. You can add some fresh lime juice to the bowl you saved to help give it more of the flavor your jar will have.
Step 4: Canning Your Salsa Verde
This recipe makes about 3-4 pints of salsa. You can easily double it to fill up your canner. Ensure your jars are sterilized by preparing a water bath and boiling the jars with at least an inch of water above the rim for at least ten minutes.
To process the salsa, you will want to add hot salsa to hot jars while leaving about half of inch of headspace from the top. Wipe the rim with a little bit of vinegar to ensure it seals. Add your lid and tighten with a ring until fingertip tight.
Once all jars are full you will want to repeat this water bath process by ensuring all jars are covered by at least one inch of water and letting the water boil for 15 minutes.

Once all of that time has elapsed, turn off the heat and wait 5 more minutes. Then take out of the canner and let sit until cool, usually 12-24 hours. Remove the rings to ensure the jar has sealed, and wash the jars. Then label the jars and date it before putting them in storage. Keep the jars a relatively temperature controlled area for up to 6 months.
Conclusion
We will always try to keep some red salsa around too, but it feels so good to be able to both have variety and to make use of something that could have potentially gone to waste. I did not expect to get 20+ some odd pounds of green tomatoes, but when a killing frost comes, we try to harvest everything and make use of everything. It has been a great addition to a dinner table snack tray with chips and veggies, to go on top of chicken enchiladas, and to even use it as an ingredient in Chicken Posole. We even use as an additional condiment when we make our Red Chili Pork Tacos.
Have you ever had Salsa Verde either at home or in a restaurant? Did you like it? What is your favorite use of Green Tomatoes? Leave a comment below!

Mastering Salsa Verde with Tomatillos or Green Tomatoes
Equipment
- 1 Rimmed Baking Sheet
- 1 Stock Pot
- 1 Immersion Blender Food process or blender will also work
- 4 Pint Jars with Rings and Lids
- 1 Canning Kit
Ingredients
Roasting Tomatillos & Tomatoes
- 3 lbs Tomatillos or Green Tomatoes
- 4 tbsp Olive Oil separated
- 2 tsp salt
- 1 tsp black pepper
Salsa
- 1 cup peppers Mild (little to no heat): 1/2 of one large bell pepper and 2 medium size poblanos; : Medium (some heat): 1 Serrano pepper, 3 jalapeños, 1/2 of one bell pepper; Hot: 5 medium Serrano peppers, 3 medium to large jalapeños, and 2 medium poblanos
- 1 cup onions
- 8 cloves garlic
- 1 tbsp olive oil
- 1 tbsp cumin
- 2 tsp salt
- 1 tsp onion powder
- 1 tsp garlic powder
- 1 tsp smoked paprika
- .5 cup bottled lime juice
Instructions
Roasting Tomatoes/Tomatillos
- Preheat oven to 450 degrees and line a rimmed baking dish with foil (for easy cleanup) and add 2 tbsp of olive oil to pan4 tbsp Olive Oil
- Slice the tomatillos/tomatoes in half and coat in a bowl with 2 tbsp of olive oil, 2 tsp of salt, and 1 tsp of black pepper3 lbs Tomatillos or Green Tomatoes, 4 tbsp Olive Oil, 2 tsp salt, 1 tsp black pepper
- Place tomatillos/tomatoes cut side down on the baking dish and roast for 20 minutes or until the skin is charred, juices are running, and you can peel tomatoes (if using).
Making Salsa
- Chop peppers and onions and mince garlic and set aside.1 cup peppers, 1 cup onions, 8 cloves garlic
- Heat 1 tbsp of olive oil over medium heat in a large stock pot.1 tbsp olive oil
- Add peppers and onions to stock pot and cook for 3-5 minutes
- Lower the heat of the stock pot and heat to medium low and add garlic. Do not let the garlic burn.
- Once your tomatoes/tomatillos are done cooking, remove any skins from tomatoes and add the tomatillos/tomatoes (without skins) and their juices to the stockpot with the garlic, onions, and peppers.
- Using an immersion blender, blend everything until it is desired thickness. Alternatively, working in batches, add chunky salsa to a blender or food processor until desired thickness and add back to stockpot.
- Then add cumin, smoked paprika, garlic powder, onion powder and stir to combine.1 tbsp cumin, 2 tsp salt, 1 tsp onion powder, 1 tsp garlic powder, 1 tsp smoked paprika
- Save any salsa that you might want to eat today and put aside. Then add half cup of concentrated lime juice to the salsa and stir. Boil for one minute.
Canning
- Sterilize pint jars by boiling for 10 minutes and leave on warm. Sterilize lids and rings based on manufacturer's guidelines.
- Begin boiling a canner with water over high heat enough to cover the pint jars by at least one inch.
- Using a funnel and ladle, add salsa to pint jars and wipe the rim with vinegar to ensure a clean seal. Place lids on and add rings and tighten to fingertip tightness.
- Add salsa jars to the canner and water bath (allow water to boil at least one inch above jars) for 20 minutes.
- After 20 minutes, turn heat off and let sit for 5 minutes.
- Carefully remove from canner and let sit for 12-24 hours until cool
- Remove rings and wash and label your jars before storing for up to 6 months in a cool dry area.
Notes
- Spiciness of salsa:
- Mild (little to no heat): 1/2 of one large bell pepper and 2 medium size poblanos;
- Medium (some heat): 1 Serrano pepper, 3 jalapeños, 1/2 of one bell pepper;
- Hot: 5 medium Serrano peppers, 3 medium to large jalapeños, and 2 medium poblanos
- You can use an immersion blender to ensure everything has been thoroughly blended or work in batches to break it down in a food process or blender.


Leave a Reply